Tuesday 21 September 2021

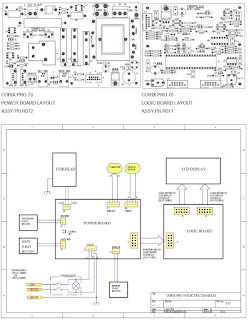
Corix PRO 70 DIGITAL Detal Xray machine fault codes


CORIX PRO 70 - WM (WALL MOUNT)

When turning on the equipment, the display will show the screen presented in Fig. 1. This screen shows the Equipment Model and the software version. At this point, the equipment will execute a “self testing procedure” in order to early
detect some kind of mal-functioning. This testing will take a few seconds.
Next, the display will show the screen presented in Fig. 2. At this point, if the “F1” key is depressed within 5 seconds, the “Menu” routine will be accessed. If not, the “Main” screen will be accessed.

When the “Main” screen is accessed, the display will show the screen presented in Fig. 3.
Once the “Main” screen is accessed, it is possible to set pre-programmed times for automatic exposures or set the timer in manual mode. Of course, it is possible at any time to switch between automatic and manual time exposures.


ERROR AND FUNTIONAL MESSAGES
The Control Panel is provided with a self diagnostic function which constantly monitors the system and its most important safety circuits. When a problem occurs, the system will show a message on the display to alert the user of this
situation.  The control unit is constantly monitoring the Main Line Voltage. If the line voltage is lower than 10% of the nominal line voltage, the display will show the message presented in the Fig.21. If the line voltage is higher than 10% of the nominal line voltage, the display will show the message presented in Fig. 22.  Once the line voltage returns to its operating range, the control unit automatically resumes its operation and the display will show the screen presented.


CHECKS AND CORRECTION OF POSSIBLE FAULTS IN DENTAL RADIOGRAPHS


LOGIC BOARD ADJUSTMENTS AND SETTINGS

Nominal Operating Line Voltage Setting
This setting is controlled by the Dip Switch “SWI” (see Fig. 2) according to the next table.  The Dip Switch is preset in the Factory and must never be changed by the user.
b) Internal Voltmeter Calibration
This adjustment is controlled by the Trimmer “POT1” (see Fig. 2) It is preset in the Factory and must never be changed by the user.
c) LCD Display Contrast Adjustment.
This adjustment is controlled by the Trimmer “POT2” (see Fig. 2) It is preset in the Factory and if necessary, it may be changed by the user.


PRE-SET EXPOSURE TIMES
The following tables of pre-set exposure times in seconds show the rated exposure time for a nominal line voltage of 120Vac (230Vac) and the final corrected exposure time, as a function of the line voltage correction factor, patient size and type of Film (D, F or Digital Sensor) for the minimum 108Vac (207Vac) and maximum 132Vac (253Vac) line voltage operating range.


PRACTICAL PROCEDURES FOR MEASURING TECHNICAL FACTORS
KVp
is defined as the high voltage value applied to the X-Ray tube after preheating time. KVp value should be measured by a non invasive instrument with an accuracy of over 2% to the nominal value.
The anodic current value (mA) is defined as the average value of a steady state current through the X-Ray tube after pre-heating time.
The anodic current value should be measured using a digital voltmeter. To do this, it is necessary to remove the Tube head plastic covers. This operation must be performed only by a qualified technician. To take this measurement, the digital voltmeter should be selected on DC and read the voltage drop at the ends of a 1KΩ, 1%, assembled on the Tube head. The relation of transformation is given by 1mA = 1V. Execute an exposure of at least 1s.
The time interval measured from the moment where the anodic peak current first exceeds 25% of the steady state to the moment it again reaches 25% when decreases is called the exposure time (t).
When taking a measurement of this time, nominal line voltage should be selected, and a digital memory oscilloscope should be used to read the voltage drop across the 1KΩ resistor. The “pre-heating time” is the time taken for the anodic current to reach 25% of its steady state value.

MEASURING EXPOSURE TIMES
The use of non-invasive equipment, when measuring functional parameters of XRay devices like exposure time, has led to introduce some interpretation issues.
The root of these issues is due to the anodic current wave form which is represented in the next figure:  IEC 60601-2-7 (1998) regulations reads: “in equipment where the filament is switched on and high voltage is applied simultaneously, the exposure time is calculated as the interval between the instant when the anodic current exceeds 25% of the nominal value and the instant when it goes below such value”. The last figure shows the anodic current wave form for an exposure of 0.2s with a pre-heating time of 0.23s. It can be seen that the time named “Delta” measured in the interval when the anodic current exceeds 25%, represents the actual exposure time (204.0ms).
Although, non-invasive methods can be simpler to perform than the invasive methods, they may lead to errors which can be considerable when determining exposure time. Calculations of exposure time obtained by using non-invasive
methods may lead to the conclusion that the unit timer is not accurate enough to meet the regulations.

Electrical Features
The supply line must meet the requirements specified on Label # 2, located on the Control Panel:
- 120 VAC +/- 10% – 10 Amp., 50/60 Hz, single-phase mains voltage + ground,
or:
- 230 VAC +/- 10% - 6 Amp., 50/60 Hz, single-phase mains voltage + ground.
The equipment must be wired to an electrical panel whose characteristics comply with the electrical regulations in the country where it is installed. A dedicated line protected by a 10A circuit breaker is recommended.


Saturday 15 August 2020

How to replace the probe head of the Huntleigh pocket Doppler


Huntleigh  HIGH SENSITIVITY POCKET DOPPLERS Probe Head Replacement Procedure

Periodic inspection is essential to ensure continued effective operation.

Equipment Required

Case splitter part number 6AE025 (not required for D920, D930, FD1 & FD3).

 20MHz Oscilloscope (Gould OS300 or equivalent) and x10 probe.

 Plastic jawed vice.

 DVM on current range

 Synthesised signal generator

 Head alignment service kit, part number 6AH072.

 Frequency counter

 Soldering iron

 New case halves, part number 6AE114.

 Power supply

The PCB assemblies used in the main unit and probe contain electrostatic device (ESD). These may be permanently damaged by electrostatic potentials encountered in routine handling of the assemblies during servicing.

Recommend that all servicing be carried out in a specialised handling area, (SHA) as defined by CECC00015 to avoid damage to the assemblies.

Preparation - For High Sensitivity Probes OP2HS, OP3HS, VP4HS, VP5HS, VP8HS, VP10HS, EZ8)

The retractile cable must be disconnected from the control unit before head replacement can begin.

A spare retractile cable or the retractile cable from the unit must be disconnected from the control unit before a head replacement can begin.

Dismantling Procedure - (All probes except D920, D930, FD1 & FD3)

Align the case splitter jaws as shown below.

Gently squeeze the splitter handles together to release the case internal clips.

Remove the case splitter and separate the case halves from the probe assembly.

 Carefully unplug the probe head.

De-solder the wire(s) from the screen tube and remove tube.

Clamp PCB lightly in vice along its length avoiding stress to the board.

[The retractile cable must be disconnected from the main unit before a head replacement can begin.]

Remove the probe clips from the probe with a firm leverage.

Discard clips.

With the clips removed, take off the Head Assy by disconnecting it from the 4 way connector on the Probe PCB.

Detach the case moulding from the end cap and slide case moulding over the probe.

Discard the case moulding.

De-solder the wire from the copper screen tube.

Remove the tube.

Dismantling Procedure - D920, D930, FD1 & FD3

Note: The retractile cable must be disconnected from the main unit before a head replacement can begin.

Remove the probe clips from the probe with a firm leverage.

Discard clips.

With the clips removed, take off the Head Assy by disconnecting it from the 4 way connector on the Probe PCB.

Detach the case moulding from the end cap and slide case moulding over the probe.

Discard the case moulding.

De-solder the wire from the copper screen tube.

Remove the tube.

New Head Fitting and Alignment.

Select a new head of correct frequency, identified as shown below.

The probe heads are colour coded on the rear of the head as follows:

Connect the head adaptor PCB (supplied with head alignment service kit) to the probe. Fit the head to the adaptor PCB as shown.

Connect the probe in series with the DVM set to measure current and power supply (check that voltage is 5V +/- 1%) as shown below, using power supply adaptor PCB(D920, D930) and adaptor cable (OP/VP probe).

Power Supply Wiring

Switch on power supply.

 Connect scope probe to the Transmitter Terminals (Tx) of the head adaptor PCB and observe Sine wave.

 Adjust PR1 to obtain 1.5V +/- 0.5Vpp.

Adjust T1 to minimise supply current.

Head adaptor PCB

Head Adaptor PCB Ref : 6AH185  To be used with Head Assemblies:

SP-HEAD - VP4HS

SP-HEAD - VP5HS

SP-HEAD - VP8HS

SP-HEAD - VP10HS

SP-HEAD - EZ8HS

SP-HEAD - OP2HSG1

SP-HEAD - OP3HSG1

SP-TDR - OP2HSB1

SP-HEAD - OP2HSB1

SP-TDR - OP3HSB1

SP-HEAD - OP3HSB1

Head Adaptor PCB Ref : 6AH185-B.  To be used with Head Assemblies:

SP-HEAD - OP2HSG2

SP-HEAD - OP3HSG2

SP-TDR - OP2HSB2

SP-HEAD - OP2HSB2

SP-TDR - OP3HSB2

SP-HEAD - OP3HSB2

SP-726222 = SP-726219

SP-726224 = SP-726218

Vascular Probe Head Assemblies Only [e.g. VP8HS, VP5HS, VP4HS, VP10HS]

Refer to the Head Assembly to determine drive voltage output for the selected transmitter impedance (see Figure ) Set transmitter voltage using PR1

Obstetric Probe Head Assemblies Only [e.g. OP2HS, OP3HS]

Whilst observing the probe supply current, adjust PR1 so that supply current = 35 mA.

If 35mA cannot be obtained, set PR1 to maximum current.

Record this reading on the Device History Record Sheet  along with transmitter impedance and date code.

(e.g. Date "21st June 1993", Product "OP2", Serial Number "135",

Transmitter Head Impedance "24", Drive Voltage "3V", Supply current “35mA”, Date Code "TAD").

 Check that supply current is;

By adjusting T1, <45mA for VP4, VP5, VP8, VP10, EZ8

Turn off the power supply and disconnect probe.


Friday 25 May 2018

Labomed Vision 2000 and Olympus CX21 microscopes maintenance and service


HOW TO CLEAN THE EYEPIECE
Wrap a sheet of lens tissue around a cotton swab as illustrated. If the area to be cleaned is large, wrap the lens tissue looser and thicker. Otherwise, make a thin, tight wrap.
Dip the wrapped lens tissue in the cleaning solution, and wipe the eyepiece from the center towards the periphery in a circular motion.
1) Never rub the lens surface strongly.
2) Do not use the same lens tissue to clean more than one lens.
3) Do not moisten the lens tissue with an excessive amount of cleaning solution.
4) When cleaning with tweezers, be careful not to protrude its tip from the lens tissue.
Preparing for Inspection
1) Set the main switch “A” to “I” (ON).
2) Adjust the brightness by turning the adjustment knob “B” .
3) Place a specimen on the stage.
4) Engage the 10X objective in the light path.
5) Rotate the condenser height adjustment knob ”C” to move the condenser to the highest position.
* The condenser is usually used in the highest position. If the entire observed field of view is not bright enough, brightness may be improved by lowering the condenser slightly.
6) Looking through the eyepiece in the right sleeve without the diopter adjustment ring, turn the coarse and fine focus adjustment knobs “D” to bring the specimen into focus.
7) Looking through the eyepiece in the left sleeve with the diopter adjustment ring, turn only the diopter adjustment ring “E” to focus on the specimen.
(At this time, adjust the interpupillary distance so that the binocular visions on the left and right fields of view coincide completely.)
8) Adjust the aperture iris diaphragm;
Since the aperture irirs diaphragm has an objective magnification scale (4X, 10X, 40X,100X), rotate the diaphragm ring “F” so that the magnification scale corresponding to the objective in use faces frontward.
Checking Dirty Portion
Image influence caused by dirt on each component
The following figure shows the influence of image on each optical component if stains or dust is adhered to that portion.
In general, the microscope image is largely affected by dirt adhered on the nearer portion to a specimen and image surfaces.
Therefore, the optical components should be kept clean and dust-free.
A Dirt is clearly seen.
B: Blurred contours of dirt is seen.
C: Dirt is seen when the aperture iris diaphragm is stopped down.
D: Dirt is not directly seen, but contrast of image deteriorates
How to find dirty portion through observation
1) Close the aperture iris diaphragm.
(When the aperture iris diaphragm is closed, it facilitates finding the dirt particles because the depth of focus increases and the dirt position bring into focus. However, very small dirt particle may not be found in this method.)
2) Observe a specimen through the eyepiece.
If dirt is seen by observing it, look for the portion where stains or dust is adhered by following the description below.
Note: If dirty portion cannot be identified in the above, it is assumed that internal lens and prism are contaminated.  In this case, please contact your Authorized dealer.
How to check cleaning condition
1) When a large lens is checked, look at the lens while putting it toward bright side or breathe on the lens and observe the condition that the haze on the whole surface of the lens disappears evenly.
2) For a small lens such as top lens of objective, check it by magnifier.
Optical Adjustment
Mechanical Adjustment
If a specimen image is moved when the stage is brought into the desired position of specimen, it is necessary to adjust the wire tension of stage.
Adjustment method for the tension of X-wire
Final adjustment
Image backlash adjustment:
1) Under observation state (with 100X objective), move the stage to the desired image position by turning the Y-knob (A).
At that stop position, check image backlash.
If it is over 2 microns, conduct the following adjustment.
2) When adjusting the Y-movement, loosen the two screws (*1) and turn the Y-knob (A) to bring backlash within 2 microns.
* After turning the knob and temporarily tighten the screws, check image backlash in the observation state. Repeat the adjustment until image backlash is within the standard.
Screws: AWU3X4SA (*1) 2pcs.
3) For the X-movement, adjust image backlash by turning the X-knob (B) and check it in the same manner as the Y-knob.
Screws: AWU3X4SA (*2) 2pcs.
* The tension of X/Y knob becomes heavy or light by turning the knob as following direction.
Replacing Grease for Coarse/fine Adjustment Knob Ass’y
If the coarse/fine adjustment knob is not turned smoothly, replace greases on the portions described below.
(In case where the coarse adjustment knob is not turned evenly or the stage cannot be moved vertically, please contact your Authorized Olympus dealer because it is necessary to disassemble the left coarse adjustment knob (F) with shaft and/or guide unit.)
< Disassembling coarse/ fine adjustment knob>
1) Remove the fine adj. knob ass’y (A) and fine adj. knob (B) by turning them in arrow directions.  (In fine adj. knob ass’y, the left fine adj. knob is fixed to the shaft with adhesive,OT1006)
2) Remove the spring washer (C) and washer (D).
3) Remove the fine shaft mount (E) with a spanner while holding the coarse adj. knob (F).
4) Remove the coarse adj. knob (G) by turning it counterclockwise while holding the coarse adj. knob (F).
5) Remove the tension knob (H) by turning it counterclockwise.  (The washer (I) is attached to tension knob (H) with grease.)
6) Pull out the tension ring (J) while holding the convex part using a pliers.
7) Reassemble them in the reverse order.
(For applied portions of greases, refer to the figure on the right below.)

Replacing the Circuit Board
If the lamp is not lit, check if the halogen bulb (6V20W) is broken or lamp socket is burned and also check that the voltage is being outputted each from (1), (2), (3) using multimeter to identify the defective part. (Refer to the figure below.)
In case where there is a problem in the circuit board, replace the circuit board as a whole because the components can not be supplied. Since the rheostat ass’y is incorporated in the circuit board,
the voltage adjustment is not necessary. ( It has been already adjusted: Min. 1.5V or less, Max. 4.5V +/-0.3 )
Replacement of circuit board / socket
Replacing Pinion Ass’y of Plane Stage
(1) Loosen the stopper (A) and remove the condenser (B) downward by turning Screws : AB3X8SA, 2pcs. (*1) the knob (F).
(2) Remove the left dovetail (C) as seen from the front side.
(3) Remove the right dovetail (D).
Screws : AB3X8SA, 2pcs. (*2)
(4) Remove the pinion spring (E).
(5) Remove the pinion ass’y (F).
(6) Assemble the reverse order of disassembly.
Note on assembly
Apply grease to the portions shown as the above figure.
2) The right dovetail (D) is mounted by pushing it in the arrow directions.
3) The left dovetail (C) is mounted by pushing it in the upward direction.
At this time, adjust the position of dovetail (C) in the left and right directions so that the condenser moves smoothly without a play (vertical movement)

Friday 9 February 2018

Mindray MEC1000 Patient Monitor – troubleshooting, beep error descriptions


MEC-1000 is a flexible, portable patient monitor. MEC-1000 can monitor physiological signals including ECG, RESP. Rate, NIBP, SpO2, and TEMP. MEC-1000 can convert these physiological signals into digital signals, which can be further processed and used to judge whether to trigger alarm. The user can control the operation of MEC-1000 via using the buttons on the front panel. MEC-1000 can be connected to the central monitoring system via the Mindray network so as to form a network monitoring system.
MEC-1000 uses ECG electrodes, SpO2 finger sensor, blood pressure cuff and temperature probe to measure the physiological signals including ECG, NIBP, SpO2, TEMP and RESP Rate. In the process of measurement no energy or substances are extracted from and/or delivered to the patient with the exception that sine wave signals are delivered to the patient during measuring RESP Rate. MEC-1000 converts the acquired physiological signals into digital signals, waveform and numerical values and displays all information on the screen. The user can also control the operation of the monitor via using the buttons on the front panel. The user can set alarm limits for each parameter. In this way once finding a physiological parameter exceed the pre-set alarm limits, MEC-1000 will activate its visual and audio alarm (the numerical display flashes or lights on) in order to raise the user’s attention.
During treatment, it is highly important to continuously monitor the vital physiological signs of the patient to transmit the important information. Therefore patient monitor has always been occupying a very important position in the filed of medical devices. The continuous improvement of technologies not only helps us transmit the vital physiological signs to the medical personnel but also simplifies the measurement and as a result raise the monitoring efficiency. For inpatients, we need to measure those vital cardiac and pulmonary signs such as ECG, SpO2, blood pressure and TEMP, etc. In recent years, the technological improvement pertaining to measurement and information transmission has led to more comprehensive performance and stable quality of the patient monitoring products. In the past, the dominant products manufactured by medical device manufacturers are mainly those for single parameter measurement. Nowadays however multi-parameter patient monitors are more widely and commonly used.
MEC-1000 patient monitor can measure physiological signals including ECG, RESP., NIBP, SpO2 and TEMP. It can convert these physiological signals into digital signals and further display them on the screen. The alarm limits can be user-defined. Once finding a parameter reach or exceed its pre-set alarm limits, MEC-1000 can automatically activate the corresponding alarm. In addition, the user can operate the monitor by using the buttons on the front panel. In addition to outpatient department, monitors are generally used in some clinical areas such as ICU, CCU, operation room and emergency room because the monitor
can provide many other physiological parameters of the patient to medical personnel. Only the qualified medical personnel shall use MEC-1000 patient monitor.
MEC-1000 Principle
MEC-1000 portable patient monitor has been designed to measure physiological parameters including ECG, RESP, TEMP, NIBP and SPO2, etc. Figure below shows the structure of the whole monitor as well as the connection relationships between different parts. The board in the center of the figure is the core part of the monitor, i.e., integrated board for main control and parameter measurement, which, though being a single board, could realize the measurements of five said parameters; accordingly uniform AD conversion and digital processing system is used.
MEC-1000 is made up of following parts
1) Parameter measurement part
2) Main control part
3) Man-machine interface
4) Power supply
5) Other auxiliary part
Troubleshooting
System alarm prompt table
Back display with white or blurring screen
1) Check if TFT connecting wire is well contacted;
2) If changing connecting wire cannot solve the problem, replace the TFT screen;
3) If fault still exists, replace the main control board.
Encoder fault
1) If other functions of the keypad run correctly (indicator, alarm light and key), go to the
second step; otherwise, replace the keypad;
2) Check if the bonding pad of the encoder is short-circuit connected or abnormal open circuit;
3) Replace the encoder.
No alarm sound
1) Check if the sound is switched off in the software setups;
2) Replace the speaker;
3) Replace the keypad.
Can not print
1) Check if the software has alarm related to recorder; if yes, remove the corresponding
alarm;
2) Check if the indicator of the recorder is lighted on;
3) If not, check the connecting wire of signal input of the recorder;
4) Check if the recorder module is set to ON in the MAINTAIN menu;
5) Check the connecting wire of the power input of the recorder (including power board of the recorder);
6) Replace the recorder.
Abnormal paper feeding
1) Check if foreign objects are attached to the paper bail of the recorder;
2) Check if foreign objects are attached to the gears of the thermal head of the recorder;
3) Check if the power voltage of the recorder is >7.8V.

Monday 27 March 2017

How to assemble an ECG simulator - Biomedical testing equipment

 An artificial signal that corresponds to an actual ECG signal is needed for the development and servicing of ECG equipment.   The simulator described here produces a suitable signal.  Since this signal is crystal controlled, it can be used for the calibration of pulse rate displays.  In order to make an electrocardiogram, electrodes are attached to specific locations on the body such as the forearm, calf and the breast cage.  The electrical potentials produced by the activity of the heart, as measured between these electrodes, and then recorded. The source of the voltage for the heart muscle, the sinus node, a pulse that branches into two main parts.  The pulse and the progression of the execution can be measured on the surface of the body.  The shapes of the resulting wave forms and their progression over time provide doctors with important information regarding deceases of the heart and circulatory system.  The ECG can be either continuously displayed on a monitor or traced by a pen on paper for documentation.  In the later case several; different versions of the signal measured at different points are often recorded at the same time.  with this type of ECG; which is called a surface ECG the measured potentials lie around 1mV.  The heart rate can lie between 40Hz and 150Hz.
Medical specialists use the letters ‘P’ through ‘U’ to refer to the various curves and spikes of the ECG.  Modern ECG recorders and monitors verify and evaluate the input signal and are able to filter out artifacts and foreign signals such as pacemaker signals.  This means that a simple square wave generator is not satisfactory as an ECG simulator, since the ECG equipment would simply ignore such a signal.  The signal produced by the simulator described here has been successfully tested on several different ECG recorders and monitors.  If anybody wants assembled and tested unit contact me.
 The micro-controller system is normally used to generate the test signal in industrial ECG test equipment which is consequently rather expansive.  Only two standard logic ICs and a few passive components are used.  IC1 is a 24 stage binary counter with an integrated oscillator and divider.  With the indicated crystal frequency of 41194304Hz, a 16Hz square wave signal appears at the Q18 output [pin-10].  Switch S1b picks up a second signal [2Hz or 1Hz].  The 16Hz signal clocks IC2 which is a decimal counter with ten outputs.  The second signal is differentiated by the combination of C3 and R3.  Needle shaped pulses are present at pin 15 of the decimal counter [IC2], as indicated on the schematic diagram. These pulses reset the counter to zero at the appropriate times. The job of diode D2 is to block the negative pulses.  The decimal counter reputedly  reaches a count of ‘9’ and holds this state, since pin 11 is connected to the /Enable input [pin13].  It is only reset when the reset pulses occurs. The setting of the switch thus influences the duration of the ‘U’ interval, which ultimately results in a simulated heart rate of either 60Hz or 120Hz.  If necessary, a 4MHs crystal can be used.  This will reduce the heart rate of the signal to 57.2Hz or 114.4Hz respectively.
 The ECG signal is generated in a remarkably simple manner using a dozen discrete components.  Time displaced square wave signals appear at the Q1, Q4 and Q6 outputs.  The first pulse [from pin number- 2] is converted into the ‘P’ wave by the integrater R6/C4.  The value of R6 is chosen such that C4 charges exponentially from ‘0V’ to around ‘1V’. The ‘T’ wave is generated by a second integrator [R7/C4].  Since R7 has less than half the resistance of R6 charges C4 to more than twice the voltage [2.2V] of the ‘P’ wave.
The differenciator C5/R10 inserts the ‘R’ pulse between these two waves.  Resistor R8 limits the charge current for C5; while D5 ensures that the peak value of the pulse does not exceed approximately 3.8V.  the negative portion of the pulse; on the falling edge of the input pulse; is shorted out by D4, wo that all that remains is a good (- 0.7V) due to the voltage drop of D4.  This produces a very pretty ‘S’ component.  Diode D3, with its series resistor R9 flashes during the ‘R’ spike.
The signals from both integrators and the differentiator are summed by R11 and R12.  Capacitor C7 smoothes out excessively spiked pulse components.  The final waveform is also shown on the schematic.  The voltage divider provides the output signals with amplitudes of 1mV and 1V. 
Insensitive equipment that normally works with signals that have already been amplified, such as secondary monitors can be connected to the second output.  A 9V battery can be used as power source.  The circuit draws’ only around 2.5mA current; so the battery will last longer. For testing, battery power is recommended.
I’ve assembled and tested this circuit, and working fine.  Tested with different brand ECG machines.
A prototype that I’ve assembled is displayed here.

Circuit diagram
If you wish to get more details, contact  google.com/+GopakumarGopalan

Saturday 6 August 2016

Aespire 7900 Anesthesia Machine - How to change the canister

When to change the absorbent
The absorber canister is available in two versions: Disposable Multi Absorber and Reusable Multi Absorber. Both are removed and installed on the breathing system in the same way.
Each canister holds 800 g of loose absorbent. Datex-Ohmeda recommends Medisorb absorbent.
Both absorber versions should only be used with air, oxygen, nitrous oxide, halothane, enflurane, isoflurane, desflurane and sevoflurane.
A gradual color change of the soda lime in the canister indicates absorption of carbon dioxide. The color change of the soda lime is only a rough indicator.  Use carbon dioxide monitoring to determine when to change the canister.  Discard the absorbent when it has changed color. If left standing for several hours, soda lime may regain its original color giving a misleading indication of activity.
Removing a canister
The absorber canister is available in two versions: Reusable Multi Absorber and Disposable Multi Absorber. Both are removed and installed on the breathing system in the same way.
Disposable Multi Absorber canister
2. System canister release latch
3. System canister support pin
4. Canister handle
5. Absorbent
6. Reusable Multi Absorber canister
7. Water reservoir.
1. Hold the canister by the handle and push on the release latch (1) to unlock the canister.
2. Remove the canister by tilting it downward and off the two support pins.
Reusable Multi Absorber canister filling
1. Turn the canister upside down and, using your thumbs, turn the cover locking ring counterclockwise to unlock it.
2. Push up with your thumbs to release the seal.
3. Lift off the cover to remove it.
4. Remove and discard the foam filters (1), the absorbent and any water in the reservoir.
5. Clean and disinfect the canister.
 [The filters must be in place to prevent dust and particles from entering the breathing circuit.]
6. When dry, place a new filter in the bottom of the canister, pour soda lime into the canister and place a new filter over the soda lime before closing and locking the cover. Wipe off any soda lime dust. Align the cover slots with the canister locking tabs and press the cover down into place. Turn the cover locking ring clockwise to lock the cover in place. Ensure cover is properly sealed to prevent leaks and spillage. Alignment of the arrows helps to indicate correct assembly.  
7. When replacing the canister, make sure it is resting on both support pins before latching it into place.
Do not use the absorber with chloroform or trichloroethylene.
The Disposable Multi Absorber is a sealed unit which should not be opened or refilled.
Avoid skin or eye contact with the contents of the absorber. In the event of skin or eye contact, immediately rinse the affected area with water and seek medical assistance.
Do not change the absorber during ventilation.
Inspect absorbent color at the end of a case. During non-use, absorbent can go back to the original color. Refer to the absorbent labeling for more information about color changes.
Desiccated (dehydrated) absorbent material may produce dangerous reactions when exposed to inhalation anesthetics.
For systems with dual absorbent canisters, the carbon dioxide absorbent material in both canisters shall be changed at least weekly, preferably every Monday morning. For single canister systems the absorbent material shall be changed every day, preferably at the start of the day.
Carbon dioxide absorbent material shall be changed whenever users cannot assure the degree of hydration of the absorbent.  Such conditions may include finding a machine with fresh gas that has been flowing for an unknown period of time, or using a machine that is used infrequently.
All fresh gas flows shall be terminated when the machine is NOT in use. (User manuals describe how to achieve null flows).
Users are advised to consider the use of low-flow techniques when the machine is in use and whenever clinically appropriate to maintain hydration of the absorbent material.
Always perform a breathing system leak test in the Bag Mode after opening the absorber.  The absorber canister is available in two versions: Disposable Multi Absorber
and Reusable Multi Absorber. Both are removed and installed on the breathing system in the same way.  Each canister holds 800 g of loose absorbent. Datex-Ohmeda recommends Medisorb absorbent.
Both absorber versions should only be used with air, oxygen, nitrous oxide, halothane, enflurane, isoflurane, desflurane and sevoflurane.